Sunday, September 29, 2013

Restaurant Review: Rosetta, Crown

It was Greg and my anniversary on Friday and he took the job himself on where we should go to dinner. I love eating out so was very excited for him to decide and all week I couldn't wait to find out where we were going as all I knew was that we were going to the city. 
 
We found our park and walked towards Crown (cue me being excited), and walked up to Rosetta, Neil Perry's Italian Restaurant situated at the Southgate end of Crown. The interior designers have done an amazing job with this restaurant and as soon as you walk in you feel at ease and like you have entered a traditional Italian Ristorante. Glass blown chandeliers hung from the ceiling and beautiful stone covered the walls. Greeted in Italian we were led to our table and given our beautiful menus (which I asked about and was allowed to take home).
 
 
While snacking on freshly made breadsticks we ordered a cocktail each. I decided on The Red Express (brandy, pineapple, lemon, pomegranate & prosecco $19) and Greg ordered a Penicillin (blended & smokey whiskies, ginger, lemon & honey $21). The Red Express was lovely and fruity, but the Penicillin was a bit too strong for me.
 
 
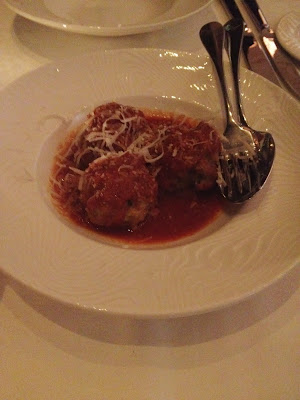
For our entrée we shared the Polpette al Forno (baked meatballs) $19. After trying some delicious meatballs in New York we were looking forward to see how these measured up and they did not disappoint! The three meatballs were so juicy and melt-in-your-mouth that I wished I could just eat these all night. Along with these we were offered fresh soft bread to dip in extra virgin olive oil (something I love as a change to the generic bread and butter).
 
 
For main we both picked a pasta dish- Greg had Lasagna al forno $39, and I had the Ox tail Ravioli $35. While I didn't try Greg's lasagne, he said it was very good and for a man that loves lasagne I take his word. My ravioli was served beautifully with spring carrots and had a burnt butter sauce. Although the servings don't look huge they were surprisingly filling.


Of course I had looked at the desserts first when opening the menu so I knew what I was going to order as it sounded so good! The Torrone al Cioccolato $21, a frozen chocolate, peanut and coconut semi freddo. The semi freddo had a crisp chocolate layer on the bottom and was sitting in a shallow pool of crème anglaise. All in all this dessert was 5 stars, something I would come back for.


Greg ordered the Torta al Cioccolato $20, which was a beautifully moist flourless chocolate cake. We both loved this cake and how it was different from the normally dense flourless cakes. This was garnished with grated chocolate and Chantilly cream.


We both had a fantastic time at Rosetta and it was the perfect place for an anniversary dinner. The classical Italian music made me feel like I was transported back into an old restaurant in Italy where you would find Frank Sinatra. For a special Italian meal I can't recommend Rosetta enough.


My Favourite BB Creams

As a swimming coach I don't tend to wear foundation every day as I look a little bit too "done up". I was so happy when BB creams came out as I found them to be perfect for me-they look natural, give decent coverage and most are well priced!
 
I've tried a number of BB creams over the past few months but I have four favourite ones.

 From left to right: Maybelline Dream Fresh BB in Fair, MAC Prep + Prime Beauty Balm, Garnier BB Cream Miracle Skin Perfector for Sensitive Skin in Light &Urban Decay Naked Skin Beauty Balm
 
 
GARNIER BB CREAM MIRACLE SKIN PERFECTOR FOR SENSITIVE SKIN IN LIGHT
 

I quite like this Garnier BB cream. I have tried the normal one too but this cream made for sensitive skin doesn't break me out and lasts the whole day. The bottle is an easy to use squeeze bottle with a flip top lid. The cream itself is quite thick, but spreads well using a foundation brush. A little goes a long way with this one as you don't need to layer it on to get a good coverage. The Garnier BB cream is a bit darker than my skin tone but it gives me a lovely glow. This is my go to BB cream when I want a bit more coverage to cover blemishes and to brighten up dull skin. With added SPF15 this gives a bit of sun coverage, but I would love companies to come out with one with SPF30 for Australia.


Available in two shades and retails for $13.99. Available at pharmacies and supermarkets.


MAC PREP+PRIME BEAUTY BALM


I picked up this beauty in America at an Estee Lauder company store. I recall paying about $18 for this (bargain for me!), and it is the of my BB creams to use as a primer and illuminator. The cream is quite thick and I find using my fingers is best for application. If used on its own I use it when I'm having a good skin day. I love that it has an SPF35 included so it is perfect for Australia!
 

(I only applied it to the left of my hand and you can see how it brightens up the skin)
 
Available in nine shades retailing at $42. Purchase at MAC stores or online at www.maccosmetics.com.au


 MAYBELLINE NEW YORK DREAM FRESH BB CREAM IN FAIR


This is the original BB Cream from Maybelline and the first one I purchased. The original reason I bought it was because of the packaging-I love the pink and white! It is the runniest of the pack so you do need to use a bit more to cover your face and it doesn't have the best coverage. I do love the dewy look it gives my skin and I seem to get the most compliments wearing this BB cream. This has no SPF which is disappointing so make sure you pop some sunscreen underneath!


Available in three shades, retailing at $15.99. Available at pharmacies and supermarkets.


URBAN DECAY NAKED SKIN BEAUTY BALM
 
 
This is another BB cream that I purchased in America as I was intrigued by the fact that there is only one shade and it self adjusts to different skin tones. It comes in a gorgeous bronze tube with a silver twist off lid. It is very dark when squeezed out but it blends in really well. I find using my fingers or a foundation brush work equally well with this. It has a medium consistency so not too much product is required. I find this to give a light to medium coverage so spot on for day to day use.


You can buy this BB cream at www.tarrazz.com.au for $45 for a 35ml tube. (I purchased a 15ml tube from Sephora while overseas)
 
 
As you can see there is a wide range of varieties when it comes to BB creams, especially in Western countries. Some are more like tinted moisturisers, some give good sun coverage and others claim to do a multitude of things. If you are after a light to medium coverage then I would definitely suggest BB creams as for me they feel lighter then foudations.
 
Do you use BB creams often? Have a favourite different from mine?

Wednesday, September 18, 2013

NOTD Ladybug Nail Tutorial

Alright another fun and simple nail tutorial for you all! I'm not exactly an expert at nail art so the simpler a nail look is the more likely I will attempt it. These nails are simple ladybugs that I think are actually quite effective. Simple, bold colours are the stars of this look and make it look a bit more effective.

 LADYBUG NAILS
1. You're going to need a strong red, black and white nail polish. I've used Rimmel London Right Royal Red, Sally Hansen Black Out and Illamasqua Scorch. You will also need a good base coat, top coat and a black nail art pen.


2. Paint your nails with a base coat and allow to dry slightly. Then apply a coat of red (or two if your nail polish doesn't give a complete coverage easily).


3. Using the black nail pen, draw a line straight done the middle of your nail from the tip to the cuticle. Then draw a semi circle at the tip. Don't worry if it is messy as this will be covered later.


4. Fill the semi-circle in with the black nail polish.


5. Then draw black dots on the red sections of your nails. I used the black pen to do this on mine, but you could use a dotting tool or toothpick with the black nail polish.


6. Near the tip of your nails, dot two circles on with the white nail polish. These need to be on the black as these will become the ladybug eyes.


7. Let the white dry for a little as it will be quite thick. Add a smaller dot on the white circle using the black nail pen. Finish off with a thick coat of your top coat and clean up any messy polish marks that missed the nail.


     What do you think of this nail art look? Do you like cute nail art looks to mix up your manicures?


Monday, September 16, 2013

NOTD Mermaid Tail Tutorial

I've been on a nail art craze lately as I've had a lot of free time during the day and I haven't been feeling the best (painting my nails always makes me feel better!). I was looking for some ideas online yesterday and found some pretty cool fish scale ones so I decided to try to recreate them and make them look like a mermaids tail :) I've done a basic tutorial below so you can have a go too! (sorry for the not amazing quality of the pictures, my bf has my camera cards so I had to use my phone).


  MERMAID TAIL NAILS

1. Decide on the colours you are going to use. I used yellow (Rimmel London Lemon Drop), green (Sally Hansen Mint Sprint) and blue (Essie Mint Candy Apple) to go with the ocean theme but any three colours that are next to each other on the rainbow will work well. Also grab your favourite base coat (Sally Hansen Base Coat) and top coat (Seche Vite Dry Fast Top Coat). For this nail look you will also need a black nail art pen (not pictured, but I used 1000 Hour) and some cotton buds and nail polish remover to clean up.


2. Paint your nails first with your base coat and then with two coats of yellow. Don't worry if it's not perfect as it will be covered up later. Wait for your nails to dry completely before moving onto the next step.


3. Using the green polish first, wipe the majority of the excess nail polish from the brush. You only want a very light splattering of colour. I found letting the polish dry for a tiny bit on the brush helped this step. Another way to do this is to use a makeup sponge. Put a small amount of colour onto the sponge and then press lightly onto the nail (I couldn't find any makeup sponges in my room so mine looks a bit messy). Do the same process with the blue now. Don't stress if this isn't perfect as you won't really be able to tell in the finished product. Allow polish to dry.


4. Now grab your black nail art pen and starting from the base of your nail draw semi circles to create the scales. Don't press too hard with the black otherwise it will smudge the colours (you can prevent this by waiting for the polish to fully harden). Let the black dry for a few minutes and then put on a clear top coat. Dip your cotton buds in nail polish remover and clean up and excess polish from around your nails. And there you have your mermaid tail nails!


Monday, September 9, 2013

Lust Have It August Box

I was lucky enough to win a Lust Have It Box from Karina at The Beauty and Lifestyle Hunter from her recent giveaway and it arrived today! I've never received or bought any of the subscription boxes that are on the market as I couldn't afford it, so I was incredibly excited when this appeared on the doorstep today!!


So..what did I receive?


Revlon PhotoReady Skinlights Face Illuminator (Full Size) $29.95
I'm so excited about this product as it is my shade! I definitely lucked out on this! Tis illuminator has shimmer particles in it so I won't be using on my whole face, just on small sections.

Revlon Nearly Naked Foundation $25.95 for 30ml
This was just a few shades on a sample card so not really enough to determine if it will work for me or not.


KMS California Free Shape Conditioner 12ml ($28.95 for 250ml) &
KMS California Add Volume Volumizing Spray 30ml ($31.95 for 200ml)

I haven't used any KMS California products so am pretty pleased to see these here. I am always on the market for conditioners that work with my hair and the Volumizing spray seems pretty interesting. I'm excited about trying these out.


Sinful Colors Nail Enamel, Full size, $4.95
The colour I received is Feeling Great and it is probably the first colour of the range I would have bought for myself! I love pinks like this and it will fit in perfectly in my polish collection.

Lush Vanishing Cream 10g ($39.95 for 45g)
I have tried a few Lush products before and they have been fantastic. There were three possibilities on the Lush moisturiser samples and I lucked out (again!) and got one suited to acne prone, oily skin and T-zone problems (this is me!). Also included in the box was a card for a free skincare consultation and a sample of any cleanser, toner and moisturiser of your choice. The card also contained a code for free shipping on their website to be used before September 30th (code is SKINCARE).


La Roche Posay Thermal Spring Water 50ml ($21.95 for 300ml) &
La Roche Posay Lipikar Balm 15ml ($37.95 for 400ml)

I have two La Roche Posay products already and I love them so there are great so I can try their other products. The thermal spring water is a spray aimed at soothing sensitive skin and the balm is meant to offer 24-hours of anti-scratching efficacy (great for small rashes or irritated skin)


Overall I am thrilled by the products I received in this box. I will definitely use all of them (I feel like they were hand-picked for me!). I have a feeling I may want to purchase some Lust Have It boxes in the future as this one was such great value and I love the full size products.

Are you a Lust Have It subscriber? If so did you get similar things in your August box?

My favourite lip products for Spring

I'm a lip product junkie and I always have been. It's the first section of a shop I will look at and the most likely purchase I will leave a shop with. I don't discriminate with the varieties out there and I love balms, glosses, tints, sticks and stains. With spring having arrived I have picked my five favourite products for the season-ones that I will be reaching for over and over.


- Philosophy Vanilla Birthday Cake Gloss : I purchased this as part of a pack in America and I am obsessed with it! It is the best smelling gloss I own and one that is very uplifting for me. I love baking and sweet things so this is perfect. The gloss has a nice shine without being sticky.

- Maybelline New York Baby Lips Special Edition : I'm not sure if this version of the baby lips is still available but it is the balm I pop on before I got to bed so I don't wake up with chapped lips. It has a slight berry scent and is very moisturising. I love all of the Baby Lips products but this is the one I reach for at the end of the day.

- Benefit Posie Tint : this was a part of one of Benefit's sets and it is such a cute product. It is a mix of baby pink and barbie pink and gives my lips the nicest colour. It is marketed as a stain but I find it isn't the most amazing stain but I still love it. I also use this as a liquid blush.

- Lanolips 101 Ointment : with spring comes more sunshine so for me I like to really look after my lips. Thankfully they don't get as chapped as in winter but when they do I reach for this product and know they will be soft and smooth again ASAP. A little bit goes a long way with this ointment.

- Estée Lauder Pure Colour Gloss in Shocking Pink: this was my first ever Estée Lauder Product and I fell in love at first sight! The gold lid and the berry pink is amazing and it smells the like berries and flowers. This is my favourite colour to wear in Spring.